






How to Turn Images into JEF Embroidery Files for Perfect Results
Embroidery has come a long way. Today, you can take a simple picture and stitch it onto fabric with great detail. This makes it easy to create custom gifts, business logos, team shirts, and home...

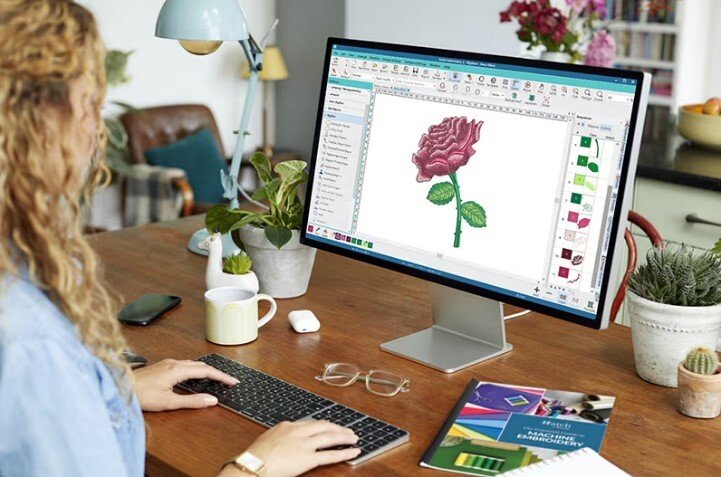
Embroidery has come a long way. Today, you can take a simple picture and stitch it onto fabric with great detail. This makes it easy to create custom gifts, business logos, team shirts, and home décor. But there is one important step before the machine starts sewing. You must change your image into the right embroidery file format.
Table Of Content
- What Is a JEF Embroidery File?
- Why You Cannot Stitch an Image Directly
- Understanding the Digitizing Process
- Choose the Right Image
- Best Image Types
- Keep the Design Simple
- Prepare Your Artwork
- Remove Extra Details
- Improve Image Quality
- Pick Strong Colors
- Select Embroidery Digitizing Software
- Create the Stitch Types
- Satin Stitch
- Fill Stitch
- Running Stitch
- Set the Stitch Order
- Adjust Stitch Density
- Add Underlay Stitches
- Save the Design as a JEF File
- Test Stitch Before Production
- Common Mistakes to Avoid
- Using Low-Quality Images
- Too Much Detail
- Wrong Stitch Density
- Skipping Test Runs
- Choosing the Wrong Fabric
- Tips for Better Embroidery Results
- Use Quality Thread
- Match the Right Needle
- Hoop the Fabric Properly
- Keep the Machine Clean
- Slow Down for Complex Designs
- Real Experience Makes a Difference
- When Should You Use a Professional Digitizing Service?
- Why File Quality Matters
- Final Thoughts
Many people want to turn images into JEF Embroidery Files because Janome embroidery machines use the JEF file format. A normal image file cannot tell the machine where to stitch. It only shows colors and shapes. A JEF file gives the machine clear stitch data, stitch paths, and thread changes. This guide will show you the full process in simple steps. It also shares tips from real embroidery work to help you get neat and clean results every time.
What Is a JEF Embroidery File?
A JEF file is a digital embroidery file used by Janome embroidery machines. It stores stitch data instead of picture data.
The file tells the machine:
- Where to place each stitch.
- What stitch type to use.
- When to change thread colors.
- How to complete the design.
This is why you cannot simply rename a JPG or PNG file as a JEF file. The image must go through a digitizing process first.
Why You Cannot Stitch an Image Directly
Many beginners think an embroidery machine can read pictures. This is not true.
Image files only store pixels. They do not contain stitch directions. The embroidery machine needs stitch commands to know how the design should be sewn.
That is why digitizing is one of the most important parts of machine embroidery.
Without proper digitizing, you may face:
- Broken stitches.
- Loose thread.
- Poor design quality.
- Wrong stitch order.
- Uneven shapes.
Understanding the Digitizing Process
Digitizing is the process of turning artwork into embroidery stitches.
This is not an automatic task. Even the best software needs human editing. Every design needs the right stitch type, stitch angle, stitch density, and stitch order.
Good digitizing creates smooth stitching and clean edges.
Poor digitizing often leads to thread breaks, gaps, and rough finishes.
Choose the Right Image
The final embroidery depends on the quality of your image.
A clean image gives better embroidery results.
Best Image Types
You can start with:
- PNG
- JPG
- SVG
- AI
- EPS
Vector files often produce the best results because they have sharp lines.
Keep the Design Simple
Very detailed images do not always work well in embroidery.
Simple artwork gives:
- Better stitch quality.
- Faster production.
- Cleaner details.
- Less thread trimming.
If needed, remove tiny details that cannot be stitched clearly.
Prepare Your Artwork
Before digitizing, spend a little time cleaning the design.
Remove Extra Details
Small dots, thin lines, and tiny text may not stitch well.
Keep only the important parts.
Improve Image Quality
A blurry image creates poor stitch paths.
Use a high-quality image with clear edges.
Pick Strong Colors
Clear color separation helps during digitizing.
It also makes thread selection easier later.
Select Embroidery Digitizing Software
Embroidery software converts artwork into stitch data.
Some software offers automatic digitizing. Others give full manual control.
Manual editing usually creates much better embroidery because every stitch can be adjusted.
Good software allows you to:
- Edit stitch density.
- Change stitch angles.
- Adjust stitch length.
- Set stitch order.
- Preview the final design.
Create the Stitch Types
Different parts of the design need different stitches.
Satin Stitch
This stitch works well for:
- Letters.
- Borders.
- Small shapes.
It creates a smooth and shiny finish.
Fill Stitch
Fill stitches cover large areas.
They keep fabric stable and create solid shapes.
Running Stitch
Running stitches are perfect for:
- Fine lines.
- Small details.
- Outlines.
Using the correct stitch type improves the final look.
Set the Stitch Order
The stitching order matters.
A good sequence helps reduce thread jumps and keeps the design clean.
Most digitizers stitch:
- Background areas.
- Large fills.
- Borders.
- Small details.
- Lettering.
This order improves both speed and quality.
Adjust Stitch Density
Too many stitches can damage fabric.
Too few stitches leave empty spaces.
Finding the right balance is very important.
Different fabrics need different stitch density.
For example:
- Cotton handles medium density.
- Denim can support higher density.
- Thin fabric needs lighter stitching.
Add Underlay Stitches
Many beginners skip this step.
That is a mistake.
Underlay stitches create a strong base before the top stitches.
They help:
- Reduce fabric movement.
- Improve stitch quality.
- Support satin stitches.
- Keep designs smooth.
A strong foundation gives much better embroidery.
Save the Design as a JEF File
After all edits are complete, save the design in JEF format.
Always check that your software exports true JEF files.
Saving the design is only one step. Testing it is just as important.
Test Stitch Before Production
Experienced embroidery shops never skip testing.
A sample stitch can reveal problems before working on the final product.
During the test, check for:
- Thread breaks.
- Gaps.
- Fabric puckering.
- Poor alignment.
- Color changes.
Small adjustments now can save time, thread, and fabric later.
Common Mistakes to Avoid
Many embroidery problems happen because of simple mistakes.
Using Low-Quality Images
Poor images create poor embroidery.
Always begin with a clean design.
Too Much Detail
Very small details may disappear after stitching.
Simplify the artwork when needed.
Wrong Stitch Density
Heavy stitching can cause fabric puckering.
Light stitching may leave open spaces.
Balance is important.
Skipping Test Runs
Never skip the sample stitch.
Testing catches problems early.
Choosing the Wrong Fabric
Every fabric behaves differently.
Adjust your design based on the material you plan to use.
Tips for Better Embroidery Results
Small improvements can make a big difference.
Use Quality Thread
Strong embroidery thread gives smooth stitching and bright colors.
Match the Right Needle
Different fabrics need different needle sizes.
Using the correct needle reduces thread breaks.
Hoop the Fabric Properly
Loose fabric can shift during stitching.
A firm hoop keeps the design in place.
Keep the Machine Clean
Dust and thread pieces collect inside embroidery machines.
Clean the machine often for better performance.
Slow Down for Complex Designs
Large designs with many details often stitch better at a slower machine speed.
Real Experience Makes a Difference
After working with many embroidery projects, one lesson stands out.
The best results rarely come from automatic conversion alone.
Every successful design usually needs careful editing. Even simple logos often require stitch adjustments before they are ready for production.
Testing, editing, and stitching again may seem like extra work, but it helps create clean embroidery with fewer problems. Over time, these small steps become part of a reliable workflow.
Professional embroidery is built on careful preparation, not guesswork.
When Should You Use a Professional Digitizing Service?
Some simple designs are easy to digitize.
Others are much more complex.
Large logos, fine lettering, detailed artwork, and layered designs often need professional skill.
A trusted company like Absolute Digitizing can help create files that stitch smoothly on different fabrics. Their experience helps reduce common embroidery problems and saves time during production.
Many embroidery businesses work with professional digitizers because they understand stitch behavior, fabric movement, and machine settings.
Why File Quality Matters
The embroidery machine follows every stitch inside the JEF file.
If the file is made well, the design stitches neatly.
If the file is poorly digitized, the machine simply follows bad instructions.
That is why file quality matters more than image quality alone.
A good embroidery file helps produce:
- Cleaner stitching.
- Better fabric stability.
- Less thread waste.
- Faster production.
- Professional-looking results.
Final Thoughts
Turning an image into a JEF embroidery file is more than changing one file type into another. It is a careful process that combines artwork preparation, digitizing skills, stitch planning, testing, and final adjustments. Each step plays an important role in creating embroidery that looks clean and lasts over time.
Whether you are creating custom gifts, business logos, uniforms, or personal projects, taking the time to prepare the design correctly will always improve the final result. If you work on complex artwork or need consistent quality, experienced providers such as Absolute Digitizing can help produce reliable embroidery files that stitch smoothly on Janome machines. Good digitizing is an investment that saves fabric, thread, and time while helping every finished design look its best.




No Comment! Be the first one.